Occurenceable UDO Sample
Required Sample Files
Compile and Link the Source Files
Copy udo_occ_sample_udo.c and udo_occ_sample_application.c
to a local directory. Compile and link the two C files.
Preliminary Setup for All Platforms
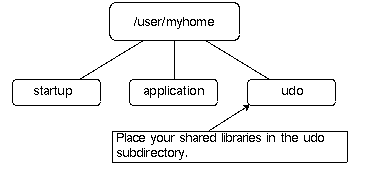
Create a new folder called
user_directory. Create a new folder in the
user_directory and call it startup. Then create another new folder in
the same directory and call it udo. Finally create
another folder in the user_directory and call it
application.

Create an environment variable UGII_USER_DIR and set it to
the location of your user_directory.
For example: UGII_USER_DIR = X:\user_directory
If you are using a local install, you may edit the
custom_dirs.dat file instead of creating the
environment variable UGII_USER_DIR. On windows the
custom_dirs.dat file can be found in \wnti32\kits\ugii\menus. Simply add
the location of your user_directory as a new line at
the end of the custom_dirs.dat file.
Now copy the file
udo_occ_sample_startup.men into the startup folder. Copy the
udo_occ_sample_udo library (.dll
on Windows, .so on Linux, or .dylib on Macos) into the udo directory. Next copy the
udo_occ_sample_application library into the
application directory. Finally copy the
udo_occ_sample_application.men menu file into the application directory.
Now to start
NX. If you edited the
custom_dirs.dat file you may need to run ugraf.exe
directly from \wnti32\kits\ugii for the change to take effect.
Running the UDO Sample
- Startup NX
- Create a new part.
- Enter the Modeling Application.
- Insert a block.
- Go to Application -> UDO Occ Sample Applications...
- Go to UDO Occ Sample Applications -> Create
Occurrenceable UDO
- Select an edge of the block.
- Select another edge that is adjacent to the first edge.
- The UDO should display as a circle centered on the face
defined by the two selected edges. There should also be a center point, and
the text with the class name "UDO_OCC_SAMPLE" should appear next to the center
point. (You may need to rotate the view to read the text.)
- Cancel out of the edge selection dialog.
- Go to UDO Occ Sample Application -> Create Non-Occurrenceable
UDO
- Select a different edge of the block.
- Select another edge adjacent to the previous edge.
- A UDO should appear as a circle on the face defined by
the edges in steps 12 and 13, but this time the text should say "UDO_NON_OCC_SAMPLE".
- Cancel out of the edge selection dialog.
- Save the part.
- Create a new part.
- Go to Assemblies -> Components -> Add Existing
- Select the part you saved in step 16.
- Make sure the reference set is set to "Entire Part"
- OK, OK to place the part
- Cancel out of the place part dialog.
- Notice that only one of the two udo's is displayed. If
you rotate the view and read the text the occurrenceable UDO is the one
visible in the assembly.
- Now make the block component part the displayed part.
- Notice that both the occurrenceable and non
occurrenceable UDO's are displayed.
